


How to Apply & Use the Freestyle Libre Sensor (Complete Guide)

Using FreeStyle Libre sensors is an essential step in keeping track of your glucose levels. To make sure you get it right, it's crucial to understand how to apply the sensors properly. In this easy-to-follow guide, we'll walk you through each step, helping you confidently apply FreeStyle Libre sensors. Here are some tips you can use to help keep your sensor in place:
How to Apply a Freestyle Libre Sensor 1 & 2
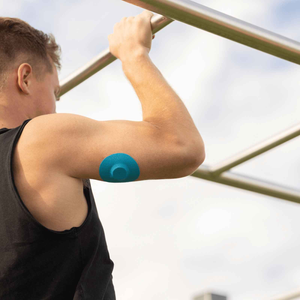
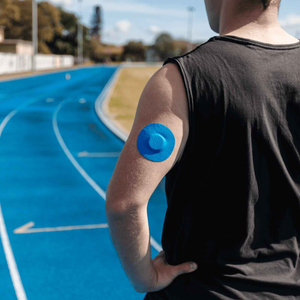
1. Choosing the site
The sensor plays a crucial role in capturing a real-time glucose monitoring, so it's important to apply it carefully.
- Pick a flat area on the back of your upper arm, ensuring it stays relatively undisturbed during your regular activities without bending or folding.
- Try to avoid spots with moles, scars, or tattoos.
- Maintain a distance of at least 2.5 cm from any insulin injection site.
- To reduce discomfort or skin irritation, ensure that you swap arms for every sensor you use.
2. Prepare Your Skin for Sensor Application
WASH:
- Choose a fragrance-free and non-moisturising soap for washing the area where you plan to apply the sensor. Ensure the soap is thoroughly rinsed off to prevent any residue.
CLEAN:
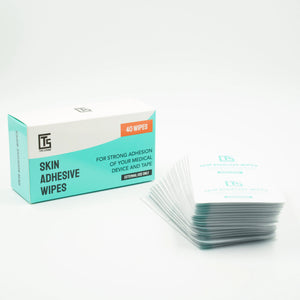
- Use an alcohol wipe to eliminate any remaining oil on the skin. Gently wipe the chosen area to create a clean surface for sensor adhesion.
DRY:
- It's crucial to ensure your skin is completely dry before attaching the sensor, especially if you've recently showered or been swimming. Allow at least 1 hr for your skin to dry after showering or swimming.
3. Prepare and Apply the Sensor (Follow this steps carefully)
Open the Sensor Pack:
- Peel off the lid of the sensor pack to expose the contents.
Assemble the Sensor Applicator:
- Twist off the cap of the sensor applicator until you hear a distinct click.
- Align the line on the sensor applicator with the line on the sensor pack.
- Firmly press the sensor applicator onto the sensor pack using a flat surface for assistance if needed.
- The sensor is now connected and ready for application.
Apply the FreeStyle Libre Sensor:
- Place the sensor applicator on the cleaned area, ensuring your fingers stay away from the blue panel.
- Push down firmly until you hear a noticeable click.
- Carefully remove the applicator from your arm.
- Confirm that the sensor is securely attached, and gently press the tape around the sensor to ensure it is adhered properly.
All that’s left to do is to start the sensor.
Here’s How to Start the Sensor (using the FreeStyle Reader)
1. Powering On the Reader:
- Begin by pressing the singular blue home button on the reader. This is the only physical button, as all subsequent actions will be performed on the device's touch screen.
2. Accessing the Sensor Start Option:
- Once the reader is powered on, navigate through the touchscreen interface to find and tap the "Start new sensor" option. This option is typically displayed on the screen, often accompanied by a visual representation of a hand holding the reader next to a sensor attached to the arm.
3. Preparing for Sensor Activation:
- On selecting "Start new sensor," an image of a hand holding the reader next to a sensor on the arm will be presented on the screen. This serves as a visual indicator to confirm that you are initiating the activation process.
4. Positioning the Reader for Activation:
- Hold the reader within 2-3 cm of the sensor on your arm for a successful scan. Ensure that the reader is near the sensor for efficient communication.
Following these detailed steps, you can seamlessly initiate the Freestyle Libre 1 and 2 sensors, ensuring a smooth transition into the monitoring phase. The combination of visual cues on the touch screen, proper reader positioning, and auditory confirmation enhances the user experience and provides confidence in the accurate activation of the sensor.
You can also use your smartphone instead of your reader to check your blood glucose levels.
How to Start your sensor using Smartphone
- First, You need to download the Freestyle Libre Link App.
- After you’ve downloaded and started the Freestyle Libre Link App, you will need to scan to start your new sensor using your phone.
- On the iPhone, there’s an additional step.
- Once you’ve logged in or created a new account, the app will bring you to the Apply a New Sensor on your phone. Tap next. An image of a person holding a phone next to a sensor on the arm will appear. Tap scan new sensor and you are now ready to scan a new sensor.
- Hold your phone to the sensor to scan it.
- You will receive a tone and vibration after successfully starting the sensor.
- But to use the Freestyle Libre app with your sensor. You must start your sensor with the app.
- It is important to note that the Freestyle Libre app and Freestyle Libre reader cannot be used with the same sensor. So, whichever device you start your sensor with, is the one you must use to check your blood glucose levels until you replace your sensor with a new one.
To scan with your phone:
- Hold your phone over your sensor to check your glucose whenever you want. When you scan your sensor, your phone instantly displays your current glucose levels.
- A Trend arrow indicates how your glucose changes and a graph shows your glucose history for up to 8 hours.
- The app makes it easy to add notes about your food, insulin, exercise, and other activities that may impact your glucose levels. In addition to monitoring your current glucose level, the app also makes it easy to review your glucose trends and patterns through a variety of reports.
- Using the Freestyle Libre App with your Freestyle Libre sensor also lets you receive glucose alarms on your smartphone. When the alarm presents a notification on your phone, just swipe to open the notification. You must follow a couple of steps for the alarms to work properly.
- During app setup, be sure to allow access to critical alerts. These are important for Android and Bluetooth permissions to ensure that your app works as designed.
- Using the Freestyle Libre app makes sharing data with your doctor easy. From the home screen, select the back button in the top left hand corner. Then, select connected apps from the menu options to open the connected app. Using the connected apps menu, share glucose data with your HCPs by accepting their invitation to connect or entering their practice ID, all from the Freestyle Libre app.
- You can also share glucose data and alarms with caregivers and loved ones using the Libre Linkup by adding them as a connection. This can also all be done from the Freestyle Libre app.
How to Apply Freestyle Libre 3
Applying the Freestyle Libre 3 sensor is easy and ensures precise glucose monitoring. Before starting, carefully prepare the back of your upper arm where the sensor will be placed. Follow these steps for the best results in sticking the sensor securely and ensuring accurate performance.
1. Cleanse the Application Site:
- Begin by washing the back of your upper arm with plain soap and water. Thoroughly cleanse the area to remove any dirt or residue.
- Wipe the cleaned area dry using a clean towel to ensure a dry and smooth surface.
- Enhance cleanliness by using an alcohol wipe on the prepared site. Allow the area to air dry completely before proceeding.
2. Assembling the Sensor Applicator:
- The Freestyle Libre 3 sensor and applicator are conveniently pre-assembled.
- Unscrew the cap from the applicator and set it aside. Avoid putting the cap back on to prevent potential damage to the sensor.
3. Positioning the Sensor Applicator:
- Place the sensor applicator over the prepared site on the back of your arm. Ensure the location is in the centre of your for optimal performance.
4. Firm Application:
- Apply gentle pressure to the sensor applicator, pushing it down firmly to affix the sensor securely to your skin. Confirm that the sensor is attached stably.
5. Securing the Sensor:
- After application, ensure the sensor is securely placed by gently pressing around the edges with your finger. This step helps to enhance adhesion and reduces the risk of accidental dislodgement.
By following these steps, you contribute to the sensor's longevity and accuracy in monitoring your glucose levels. Careful application of the Freestyle Libre 3 sensor guarantees a reliable and comfortable experience throughout its wear time.
How to Activate the Libre 3
- Download the Freestyle Libre 3 app from the app store and tap the icon to open it.
- Swipe left to see some helpful tips, or tap "Get started now" at any point.
- If you already have a LibreView account, tap Sign In. or create one in the app.
- You may have a LibreView account if you have used the Freestyle Libre Link App in the past.
- It is recommended to create a LibreView account so that you can:
- Share your glucose data and alarms with your family in real-time.
- Share your glucose data with your doctor and healthcare team so they can review it remotely.
- Connect your sensor to your account, allowing you to transfer it to a different phone. For instance, you lose or replace your phone.
- Continue following the on-screen messages to finish setting up the app.
- The setup is complete when you see an illustration to scan a new sensor. Then, you'll be ready to start your sensor.
Starting your Freestyle Libre 3 Sensor
- To start a new sensor, you need to scan it with your smartphone.
- Tap "Scan New Sensor" from the app's home screen or the app's menu. You are now ready to scan the sensor to start it.
- Touch the sensor with the top of your phone slowly. Things like proximity orientation and phone cases can affect scanning. If needed, slowly move the phone around.
- You will receive a tone and vibration after you successfully start the sensor.
- This is the only time you need to scan your sensor.
- The sensor can be used to check your glucose levels after 60 minutes. A countdown in the app will indicate how much time is left.
- Following these detailed steps, you can seamlessly initiate the Freestyle Libre 3 sensor, ensuring a smooth transition into the monitoring phase.
Friendly Reminder: When Skin reactions occur with the FreeStyle Libre system
If you experience noticeable skin irritation around or beneath the Sensor due to adhesive sensitivity, it is recommended that you promptly remove the Sensor and discontinue the use of the FreeStyle Libre system. Prioritise your skin health and consult with your healthcare provider to explore alternative monitoring options, if necessary.
Takeaways
In conclusion, applying the FreeStyle Libre sensor is a straightforward process that requires careful skin preparation. By following our comprehensive guide, you ensure optimal sensor functionality and accurate real-time glucose monitoring. We understand that prematurely knocking off the sensor is a common concern. At Type Strong, we've developed a specially designed FreeStyle Libre adhesive patch to keep your sensor secure for its entire lifetime. Our patches offer a reliable solution to prevent accidental sensor loss. Try our cgm patches today and ensure you never lose another sensor, safeguarding your investment and peace of mind.
Stay informed with the latest tips on FreeStyle Libre; explore our tips and tricks to learn how to protect your FreeStyle Libre and maximise your experience.
Frequently Asked Questions
Can you be allergic to the FreeStyle Libre sensor?
The sensor is typically designed to be hypoallergenic, but it's essential to be aware of the possibility of allergies. In the rare event that you experience signs of an allergic reaction, such as redness, itching, swelling, or discomfort at the FreeStyle Libre sensor site, you must contact your healthcare provider promptly. They can assess the reaction, provide appropriate guidance, and determine if alternative options or solutions are necessary for your continuous glucose monitoring.
Can I Remove the Sensor Myself?
Yes, you can safely remove the sensor yourself when it has completed its monitoring cycle.
Where is the best place to put the FreeStyle Libre sensor?
It is recommended that the sensor be applied to the back of the arm, which is its approved location.
Is applying the FreeStyle Libre sensor painful?
The FreeStyle Libre system is relatively painless to apply with a simple 1-piece applicator. There is a needle in the applicator to insert the filament in the back of your upper arm so the sensor can monitor your glucose.
Does the Libre FreeStyle have a needle?
The FreeStyle Libre uses a small needle as part of the sensor application process. No needle is left in the site at all during the 14-day wear. Fortunately, this process is painless for most people using the system.
How big is the needle on the Libre?
The flexible Sensor is introduced by a u-shaped sharp that is equivalent in diameter to a 23-gauge (0.64 mm) needle.
Does the newer FreeStyle Libre 2 or 3 penetrate the skin?
The sensor uses a thin, flexible filament inserted just under the skin.
Is it normal to bleed when putting on FreeStyle Libre?
It’s estimated that 1 in 100 will bleed when applying a sensor to the arm and the phrase you may often see online is that “bleeders are the best readers”. Whilst there’s nothing to confirm this to be true it is a widely used statement and it appears that so long as the blood flow stops then the readings will be fine.
How many days can you wear FreeStyle Libre?
The Freestyle Libre 14-day, Abbott's continuous glucose monitoring system, has received approval from the Food and Drug Administration. The sensor can be worn for up to 14 days with high accuracy.
For individuals managing diabetes, striving to maintain healthy glucose levels, and seeking ways to lower blood sugar without enduring painful fingersticks or dealing with a bulky continuous glucose monitor, the Freestyle Libre 14-day is a transformative technology.
For those with diabetes putting in the effort to keep their glucose levels healthy and working on ways to reduce blood sugar, the Freestyle Libre 14-day offers a revolutionary solution. Say goodbye to painful fingersticks and bulky continuous glucose monitors. This technology is truly life-changing.
What happens when Libre sensor ends?
After using the sensor for 14 days, the reader will notify you that the sensor duration is complete. At this point, the sensor will stop collecting glucose data and should be removed from the skin. You can easily see the time left until the sensor ends on both the Home and Results screens.
Can the Freestyle Libre be reused?
Freestyle Libre sensors are designed for one-time use. If a sensor has been removed or accidentally comes off, it cannot be reattached or reused. In such instances, the best course of action is to replace it with a fresh sensor. The Freestyle Libre reader will identify the new sensor and guide you through the setup process, making it convenient for you to resume continuous glucose monitoring without any disruption. This straightforward approach ensures the accuracy and reliability of your glucose data.
|
Disclaimer: The information presented on this blog is provided for general informational purposes only. It is not intended as a substitute for professional medical advice, diagnosis, or treatment. Reliance on any information provided by this blog is at your own risk, and we strongly recommend consulting with a qualified healthcare professional for individualised advice regarding your specific situation.
In addition, this blog may contain links to external sites or feature content from third parties. Please be aware that we do not undertake investigations or monitoring of these external links for accuracy, adequacy, validity, reliability, availability, or completeness. Consequently, we disclaim any liability or responsibility for the information contained therein. Users are encouraged to exercise their own judgement and discretion when accessing external content linked from this blog. |


